
Putting chicks under a broody hen is a natural way to raise baby chicks. These chicks are called hatch-a-longs. There are a few steps to follow for this to be successful. But keep in mind, there’s no guarantee your hen will accept the chicks, so keep a watchful eye after the introduction.
How To Introduce Hatch-a-Longs to Broody Hen
Make sure your hen is truly broody, which means she is sitting on eggs (or fake eggs) and exhibiting signs of wanting to hatch them. Signs of broodiness include sitting on the nest for long periods of time, puffing up her feathers, and spreading herself over the eggs giving her a flattened appearance. She may be pulling out her feathers for the nest. Important: Your hen needs to be dedicated to her eggs for at least 2 weeks.
Prepare a safe and clean environment: Choose a clean and dry area within your coop or a separate brooding area that is safe from predators, drafts, and dampness. Provide bedding such as pine shavings for the hen and chicks to nest in. A completely enclosed area is best.

Purchase day-old chicks preferably, but up to 3 days old is usually acceptable. Place the chicks in a temperature-controlled brooder with access to food & water until nightfall.
Late at night is best to place chicks under your hen. Broody hens are more receptive to accepting new chicks at night when they are more relaxed and in that weird hypnotic state that occurs after dark. Your chick feed and drinker should be in place at this time. Make sure both are close by and easily accessed by the chicks. Your hen can eat the chick starter, it will be good for her since she probably hasn’t been eating enough while broody.
Tuck the chicks under the broody hen’s wing. If possible, do this in complete darkness to minimize disruption. Avoid disturbing the broody hen too much during this process.
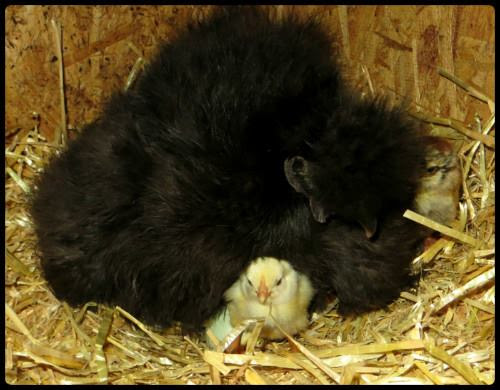
Observe the broody hen and chicks closely to ensure that the hen is accepting the chicks and keeping them warm. The hen’s body heat is crucial for the chicks’ survival, especially during the first few days of their lives.
Continue to provide a safe and clean environment for the broody hen and chicks, free from drafts, predators, and dampness. Regularly clean the bedding and ensure that the chicks have enough space to move around and grow.
In The Perfect Scenario, What to Expect
By following these steps and providing proper care, the broody hen should take care of the chicks, keeping them warm, teaching them to eat and drink, and providing them with maternal care.
After a Few Days, the hen can be allowed to take her chicks out with the other hens and she will protect them but watch carefully to make sure.
By Week Five or Six, the hen will begin distancing herself from the chicks. Make sure to have multiple feeders & drinkers, as the new birds will surely have to find their place in the pecking order. If there’s going to be drama (expect it) it will be where the food is.
Lastly, have fun, and don’t forget to enjoy the experience.


