Research, Plan, and Prepare
Raising chicks can be easy if you just do your homework before you buy. Knowing when to plan for your chicks’ arrival is also something to take into consideration. Of course, it makes good sense to have your coop set up and supplies ahead of time. But it would also be helpful to be informed of what’s new in today’s chicken-keeping market. For example, the use of radiant heat instead of heat lamps, or all the new ideas for drinkers and feeders that are designed to save you time and money.
Before you bring home chicks you’ll need a brooder box to raise them until they are fully feathered. Need help choosing the best type? No problem, here are a ton of ideas, BrooderBox Ideas. It can be anything from a cardboard box to something more extravagant as shown in the pics below. It doesn’t need to be fancy, but it needs to be convenient for you to manage, and be comfortable for your chicks. See more Brooder pics. While your chicks are in the brooder, you’ll have plenty of time to get their coop ready. Whether a DIY project or not, every coop size and style imaginal can be found HERE.
Research, have a plan, be prepared, and know what to expect, these four things will help ease your commitment so there’s more time to enjoy your birds.
It’ll be helpful to have some understanding of Basic Chicken Terminology, this reference article will help you through the maze of chicken lingo.


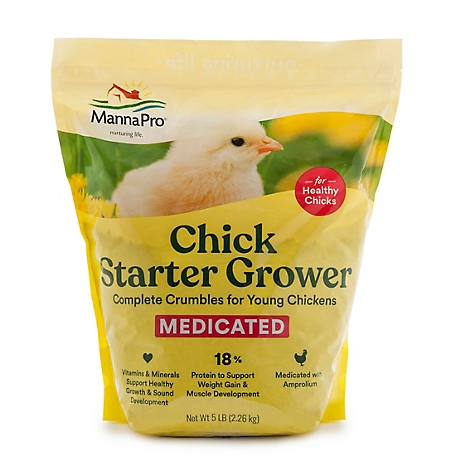
If you are raising bantams, day-old, or mail-order chicks who may be weak from their long journey, line the brooder box with paper towels for the first week. Use a drinker and feeder designed specifically for chicks and place it directly on the paper towels. Your chick’s feed is readily available at all feed stores, ask for Chick Starter. The bag will say Chick Starter or Chick Starter/Grower, they’re the same. You have one other feed detail to decide upon, Medicated or Non-Medicated. This is a feed containing antibiotics. Personally, if my chicks are mail-ordered from a hatchery, I feed them medicated for the first week. If bought from a feed store and the chicks are a week old, I feed non-medicated.
Sometimes, baby chicks act lethargic or weak from either a long trip or other stressful conditions. In this case, you may want to give them a little electrolyte boost for two or three days. Simply add Sav-a-Chick electrolytes to their water source. It’s available anywhere chicks are sold, also on Amazon.
What to Expect…..
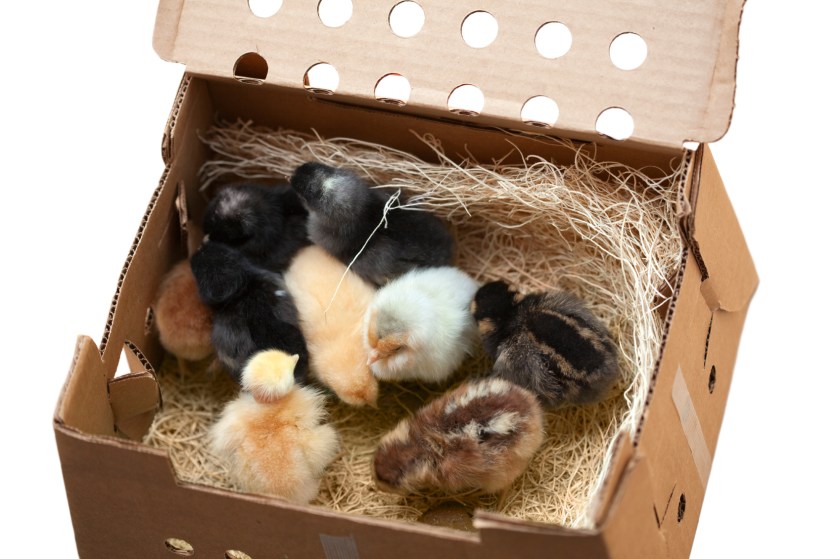
Your baby chicks will arrive in a box similar to this.

If you bought your chicks from a feed store, they’re probably a few days to a week old, and most likely accustomed to pine shavings for their bedding. It’s okay to continue using pine shavings at this point. This will help keep the brooder smelling fresh, changing it every day is good practice.
Your chicks will need enough space to move freely, and after the second week will need the box covered with chicken wire.
One-half of the brooder shouldn’t have a heat source at all. The other, preferably radiant heat which will be further explained later in this article.
Watch for poopy or pasty butts! This is a common problem usually bought on by stress, or uncomfortable living conditions during the first two weeks. Using a wet paper towel, or baby wipes, clean those fuzzy butts because this condition hinders fecal elimination… which is often fatal.
As your chicks become more active, keeping the food & drink sources clean is challenging, so here are a few tips. Raise the drinker to the height of the smallest chick’s back, this will minimize the litter from landing in their water. Use bricks, 2×4 pieces, flower pot saucers, or even a bowl upside down will do the trick.
Tip: Set their feeder in something that will catch the feed they scratch out, this will substantially minimize feed waste. Be creative, use a flower pot saucer, a pie tin, etc.
Temperature Control in the Brooder, Radiant Heat vs Heat Lamps
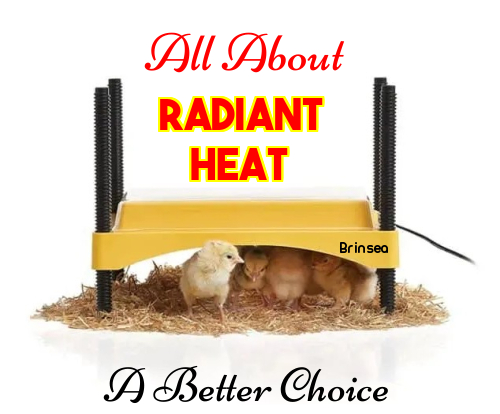

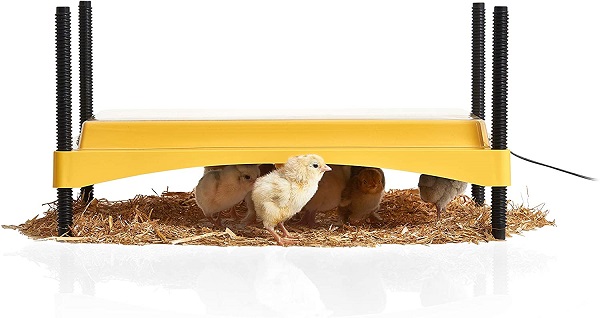
Keeping the temperature right can be a chore, especially if you depend on a heat lamp. You’ll spend a good deal of time raising and lowering it during the day as temperatures change, which is exactly why I rarely use them. I never raise chicks indoors, they’re always kept in a shed or garage during a time when overnight temperatures seldom drop below 55-60. Heat lamps have their place, but I only use them if a cold spell occurs before my chicks reach a month old. My primary heat source is radiant heat. It doesn’t heat the brooder, it only provides warmth when the chicks settle underneath it.
Your chicks will be happiest if they can touch the surface, so keep the unit nice and low, you can easily raise it as they grow. Radiant heat is certainly more natural, chicks have been settling under their mothers in cool climates to keep warm since somewhere around 6000 BC!
Radiant heat is a sufficient heat source for chicks if the ambient temperature is at least 55 degrees. Again, this is why seasonal planning for your chick’s arrival is important.
Keep a thermometer inside the box to monitor the temperature, but watching the chick’s behavior is the best indication of their comfort.
Rule of Thumb: If they’re huddled together, they’re cold. If some are eating or drinking, others sleeping, and the rest under radiant heat, you have happy chicks. There’s no worry about your chicks finding the radiant heat, place them under it when you bring them home and they will return to their comfort zone all on their own.
Note: Important Fact about Radiant Heat: The thermometer in the brooder should read at least 55 degrees. You won’t feel the heat when placing your hand under the radiant heat unit unless you touch the plate. Remember, radiant heat doesn’t heat the brooder at all, only the chicks when they are under it… so try not to stress over what seems cold to you.
What If There’s A Cold Spell?
If it’s necessary to use a heat lamp on a chilly night, avoid placing it directly over the chicks when radiant heat is available to them. A heat lamp near the coop to keep the ambient temp around 55 degrees works well.
Note: Heat lamps for chicks in feed stores are almost always only available at 250 watts. That is a lot of heat! You already have a heat source, so there’s no need to blast them with a 250-watt heat lamp. There’s an easy fix to that, 50, 75, and 100-watt heat bulbs are easily found on Amazon, choose a wattage that will keep the ambient temp at or around 55 degrees. You can often find lower-wattage heat bulbs at pet stores in reptile supplies.
Always use a red bulb, the light from the clear bulb is too bright and the chicks may become agitated, which inevitably leads to the unwanted problem of frustrated chicks pecking each other.


Keeping Chickens Indoors?
There is no need for a heat lamp at all if you use radiant heat. They will be much happier with natural lighting and far less likely to have pasty butts, which often is the culprit of chick fatality. But, there are drawbacks to raising chicks indoors, I won’t tell you not to, but here are three reasons why I don’t.
First, when chicks are ready to be moved to the coop they’ll need to acclimate to harsher weather conditions and fluctuating temperatures. Second, by the time they are three weeks old, well… they’ll stink, to put it bluntly. Trust me, You’ll be cleaning their brooder box constantly and wishing they were anywhere but your living space. They will also be very active in what has probably become very cramped quarters at about three weeks old. And Third, chicks mature slower.
The rule of thumb is to keep chicks at a controlled temperature until they are fully feathered, which is somewhere around 5 -7 weeks. Chicks raised in cooler temperatures with a moderate heat source are often fully feathered earlier.
To sum it all up… plan to buy chicks when they’ll be comfortable in a garage or outdoor shed using primarily radiant heat. This will depend on where you live, for most folks it’s springtime. For others, like the lower desert southwest, mid-February.
Three weeks is a good time to introduce a perch for your chicks. A tree branch or one-inch dowel rod will be sufficient. They’ll be reluctant to explore this strange new object, but in a day or two their curiosity will get the best of them. Learning to perch now aids in their transition to roost as adults.
Why is this important? It’s good practice to keep nest boxes clean for obvious reasons… and hens sleeping where they lay is anything but. In every coop a roosting bar should be provided, it is instinctual for birds to roost elevated, so this won’t be a difficult task to accomplish. There are however exceptions to the rule of roosting. Silkie Bantams are often reluctant to venture any higher than 3 feet… if at all.
Three weeks is also the perfect time to introduce a little grass for them to enjoy, but there are three rules. 1, No long pieces. 2, Not too much. And 3, Have grit available in the brooder to help them digest this strange new food. The grass is a good distraction to an array of possible problems in the brooder as well, such as pecking each other, or bullying. It keeps them busy! Just keep in mind, problems always occur for a reason. Most commonly, overcrowding, bright lights, or undesirable temperatures.
Moving Day, Brooder To Coop:
When your chicks are fully feathered they are ready to leave the brooder and be moved to the coop. It should be well-ventilated, spacious enough to include a roost bar, and have shelter from wind, rain, inclement weather, and protection from the sun. Provide at least one nest box for every two birds. Two square feet of ground space per bird would be adequate, but the more space you give your flock the better. Crowding is the perfect recipe for bullying when establishing early and continual pecking orders.
Feed and water should be elevated to the height of the smallest bird’s back, this will help keep their food and water clean. You can either hang them, or simply find something stationary such as bricks, or a cinder block.
Note: Some chicken keepers prefer to move their chicks to a grow-out pen before the coop. This is just a smaller coop where they’re housed until bigger. Grow-out pens are especially important if you have an existing flock, where a whole new set of rules applies for introductions.
Diet / The First Egg
Most experts recommend transitioning to layer pellets at 18 to 20 weeks of age, or when you see the first egg, whichever comes first.
Don’t Forget to Protect your Flock from Predators!


Don’t think for a minute that your flock is immune to a predator attack. There’s no place on the planet where chickens are safe from predators…. not even in your suburban backyard. And guess what, not in your coop either, unless you’ve made every effort to predator-proof every nook and cranny. That means, no animal will be able to dig under the coop or get in over the top. It means there are no gaps around doors and windows, and the coop door has a secure latch to keep them safe at night.
Looks like you’re ready to bring those babies home, enjoy the journey!

 One of the biggest concerns most people have is keeping the brooder at the proper temperature. You’ve probably read the norm… 95 degrees the first week, then lower the temperature by 5 degrees each week until the chicks are fully feathered. That’s the rule of thumb and one I have always been faithful to. However…

