The Pro’s and Con’s of Using the Brinsea EcoGlow for Chicks in Winter

An Updated Review by an Actual User of Radiant Heat

Brinsea Brooder

Raising baby chicks in winter… we’re all set in our ways. Especially me, but right now I’m practicing what I preach about not keeping chicks in the house and using the Brinsea EcoGlow brooder in an outside shelter. Radiant heat certainly has its qualities, just not in every situation. Here’s why…
Good Points
There are many valid reasons for using radiant heat instead of a heat lamp, and for the most part, I agree with them all.
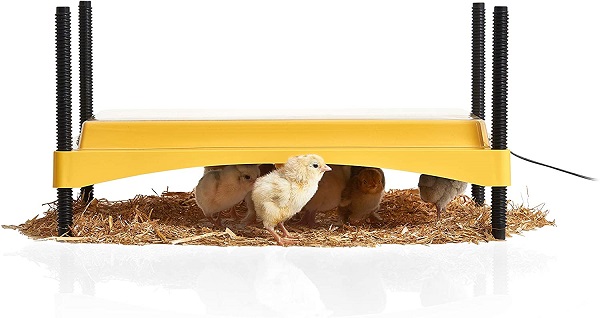
It’s pounded into our head to avoid heat lamps being they’re a fire hazard, no argument there. It’s also true that pasting up (poopy bums) is less likely to occur when using the Brinsea brooder. Another good point is radiant heat is more like being under the mother hen. But, the Brinsea does have limitations to its effectiveness.
The Downside, (but not a deal breaker)
Using radiant heat is compromised in temperatures below 50 degrees. In other words, it doesn’t offer sufficient heat for chicks when they need it most. So considering the fact we shouldn’t keep chicks in the family living space, and heat lamps are a fire hazard that should be avoided… what to do?   Every article on keeping baby chicks specifies the importance of keeping their environment at 95 the first week, then dropping the temp by 5 degrees each week until they are fully feathered.
I realize there is constant controversy over the proper way to raise baby chicks. Our family has been raising chicks for three generations. My grandmother kept her chicks in the basement near the furnace, and my mother in the kitchen behind the wood stove. I’ve kept them in a box in a spare bedroom with a heat lamp, then in the laundry room, and later in the garage. But today these practices are criticized. I’ve tried to comply with what today’s health officials consider safe chick-rearing, and here’s my conclusion and solution.
I’m currently using the Brinsea Ecoglow20 brooder for my 6-day-old chicks in an outside draft free 8×10 insulated shed. The outdoor temperature is 43 degrees. Taking into consideration that the Brinsea brooder only provides enough warmth for chicks in temps above 50 degrees, I see only one solution… a heat lamp. Securely hung above the brooder box at a height to keep the interior heat at 60. Ok… truthfully more like 70.
Do I like the Brinsea EcoGlow? Definitely, wouldn’t be without one. However, I don’t feel it’s the perfect solution with all the capabilities of kicking good ol’ fashion chick rearing practices to the curb.

Back to HOME PAGE


Raising Winter Chicks in Phoenix

When Can Chicks Be Moved Outside in Phoenix?

It’s a good guess you have your new chicks in a box in the garage or shed and are watching them quickly outgrow their safe haven of comfort and warmth.
At about 6 weeks old they are becoming a handful, looking a bit crowded in their quarters, and you’ve had enough of keeping up with the mess. I understand your dilemma and have good news for you. We live in Phoenix! With mild winter temperatures, even at 6 weeks, your chicks will be fine outside with the right housing accommodations. However, first, you’ll want to lower the temperature in their brooder over the next few days to get them used to cooler temperatures.

A suitable coop for 6-week-old chicks is something that will protect them from wind and rain. If your coop is drafty, a large tarp will do wonders. Buy the highest-grade tarp you can find, or use two.
If there’s a cold snap, say below 50 degrees, simply cover the coop with a heavy blanket. Moving blankets from Harbor Freight work great and they’re only $8. The chicks will huddle together at night and keep each other warm.
Give them lots of shavings or hay in the coop, and provide a low-sided brooder box filled with shavings in the corner for them to sleep in. If they don’t use it, that’s okay too.

Prepare for the Phoenix Heat Now

While watching your chicks grow in the confinements of their coop, this is a good time to think about summer’s arrival and prepare for their outdoor environment. Keeping chickens in Phoenix is tough, keeping them in small confinement quite honestly… can be a death sentence.
June and July will no doubt reach 110 to 115 degrees. This means, your coop could easily exceed 120 degrees, even if it’s in the shade. It’s imperative to provide a play area where they can dig holes in the dirt to stay cool.
A play area can simply be a fenced area off the coop. Look for or create a shady spot preferably near a water source so it’s easy for you to access. This is important because there will be days when you’ll want to use a mister, or maybe flood them a spot to help them cool off.

I wasn’t kidding!
Back to Chicken Keeping Resources HOME PAGE


Composting Manure

There are various reasons; of course, the obvious is fertilizer for your lawn and garden. But unless you have a farm or huge property composting isn’t much good unless you have a source for its usefulness.
Even with only a few horses I can’t possibly decompose all of the manure in a timely fashion. Especially being a small ranch within the city limits, piling it sky high is unmentionable, so I have most of it hauled off the ranch every week. However, my reason for composting has little to do with fertilizer and everything to do with replacing dirt! That might sound strange to some, but dirt is quite precious here in the desert, and by no means comes cheap to buy.
It’s almost impossible to clean horse pens twice a day and not have valuable footing dirt get shoveled out with the manure. Same with the chicken yards, they get stripped down to nothing but hard ground every few weeks. By composting horse manure I can replace valuable dirt in my pens and chicken yards. I use it to fill holes, as potting soil, and twice a year to fertilize my yard and trees.
If you’re wondering, after a compost pile is decomposed, it is nothing but beautiful clean dirt with the pleasant aroma of, well…. earth!
Below are the basics to starting a compost pile. There are many compost bins available on the market, but they are going to give you quite a workout. They are difficult to turn and depending on what your composting for, may not be of adequate size. Keep it simple, one thing I doubt you need is another chore.
Building the Pile:
The initial size of the pile should be no less than three feet high and at least five feet square. This will provide high enough composting temperatures to kill parasites, weed seeds, and bacteria.
Airflow:
Keeping air in the pile is critical to achieve proper temperature and preventing odors. Also, this will aid in the process of composting in a relatively shorter time. Turning the pile is imperative, especially during the first few weeks. The more you turn the pile the faster it will decompose.
Temperature:
It’s normal for temperatures to vary. Most compost piles start at lower temperatures then increase, and then gradually drop over several weeks. The pile should reach 135 to 150 degrees for several days, this is important not only to kill weed seeds and disease but to speed up the rate of decomposition. If the pile temperature exceeds 150 degrees you may want to reduce the size of your pile. You can buy a compost thermometer at your local nursery to best monitor temperatures.
Moisture:
Keep your compost pile damp, not soggy. You may have to cover it during rainy spells or add water to maintain the proper moisture. If the pile lacks moisture, composting organisms will dry out and prevent the pile from heating up. If the pile is too wet it will restrict airspace and cause compaction, also a factor in the pile’s inability to produce heat. If the compost becomes too wet increase the turning frequency.
Location:
Choose a convenient location, with access to a hose. Select level ground with good drainage.
What’s in the Compost Pile:
Organisms need carbon for energy and nitrogen for growth. High-carbon materials are plant materials such as straws, shavings, sawdust, leaves, and wood chips.  Materials high in nitrogen are animal by-products like manure, but also grass clippings, and hay. The best carbon/nitrogen ratio is nitrogen, 25:1, and carbon, 30:1. Too much bedding such as shavings will raise the carbon and you may have to add grass clippings or chicken manure. Without the proper carbon/nitrogen ratio the compost pile will take longer to decompose.
Time Frame of Completion:
A well-managed pile can be composted in about two months in the summer, and three to six months in the winter.
Tools:
A four or five-tined pitchfork for turning, a garden hose, and a compost thermometer. You can also insert a metal pole into the pile, as a heat indicator of activity.
A Partial List of What You Can Put in Your Compost Pile:
Hay
Coffee grounds
Leaves
Crushed egg shells
Feathers
Fruit
Fruit peels and rinds
Peanut shells
Garden debris
Straw
Grass clippings
Vegetable scraps
Grass clippings, fresh
Tea grounds and leaves
Lettuce
*Never put meat or fatty food in your compost pile.

Back to Chicken Keeping Resources HOME PAGE